
Have you ever needed to emulate a full Internet routing table, with actual AS Path attributes, and community attributes in a lab environment before?
I recently had a need for my lab environment to have the capabilities to emulate the Internet routing tables, but without actually having a peer session with a public connection. By the time you get done with this article, you will have a BGP peering session like this…
root@vmx-ixp-test01> show route protocol bgp

inet.0: 583876 destinations, 646956 routes (583876 active, 0 holddown, 0 hidden)
+ = Active Route, - = Last Active, * = Both

1.0.0.0/24         *[BGP/170] 00:17:30, localpref 100
                      AS path: 3356 1221 13335 I, validation-state: unverified
                    > to 172.16.110.2 via ge-0/0/0.0
                    [BGP/170] 00:08:31, localpref 100
                      AS path: 174 19782 13335 I, validation-state: unverified
                    > to 172.16.110.1 via ge-0/0/0.0
1.0.4.0/22         *[BGP/170] 00:17:30, localpref 100
                      AS path: 3356 6939 4826 38803 56203 I, validation-state: unverified
                    > to 172.16.110.2 via ge-0/0/0.0
                    [BGP/170] 00:08:31, localpref 100
                      AS path: 174 45177 4826 38803 56203 E, validation-state: unverified
                    > to 172.16.110.1 via ge-0/0/0.0
1.0.4.0/24         *[BGP/170] 00:08:31, localpref 100
                      AS path: 174 45177 4826 38803 56203 E, validation-state: unverified
                    > to 172.16.110.1 via ge-0/0/0.0
                    [BGP/170] 00:17:30, localpref 100
                      AS path: 3356 5413 6939 4826 38803 56203 I, validation-state: unverified
                    > to 172.16.110.2 via ge-0/0/0.0
1.0.5.0/24         *[BGP/170] 00:17:30, localpref 100
                      AS path: 3356 6939 4826 38803 56203 I, validation-state: unverified
                    > to 172.16.110.2 via ge-0/0/0.0
                    [BGP/170] 00:08:31, localpref 100
                      AS path: 174 45177 4826 38803 56203 E, validation-state: unverified
                    > to 172.16.110.1 via ge-0/0/0.0
1.0.6.0/24         *[BGP/170] 00:08:31, localpref 100
                      AS path: 174 45177 4826 38803 56203 E, validation-state: unverified
                    > to 172.16.110.1 via ge-0/0/0.0
1.0.7.0/24         *[BGP/170] 00:08:31, localpref 100
                      AS path: 174 45177 4826 38803 56203 E, validation-state: unverified
                    > to 172.16.110.1 via ge-0/0/0.0
                    [BGP/170] 00:17:30, localpref 100
                      AS path: 3356 5413 6939 4826 38803 56203 I, validation-state: unverified
                    > to 172.16.110.2 via ge-0/0/0.0
1.0.16.0/24        *[BGP/170] 00:17:30, localpref 100
                      AS path: 3356 1221 4637 174 2519 I, validation-state: unverified
                    > to 172.16.110.2 via ge-0/0/0.0
1.0.64.0/18        *[BGP/170] 00:17:30, localpref 100
                      AS path: 3356 1221 4637 10026 2519 7670 18144 I, validation-state: unverified
                    > to 172.16.110.2 via ge-0/0/0.0
1.0.128.0/17       *[BGP/170] 00:17:30, localpref 100
                      AS path: 3356 1221 4637 174 38040 23969 I, validation-state: unverified
                    > to 172.16.110.2 via ge-0/0/0.0
{{ continued ... }}
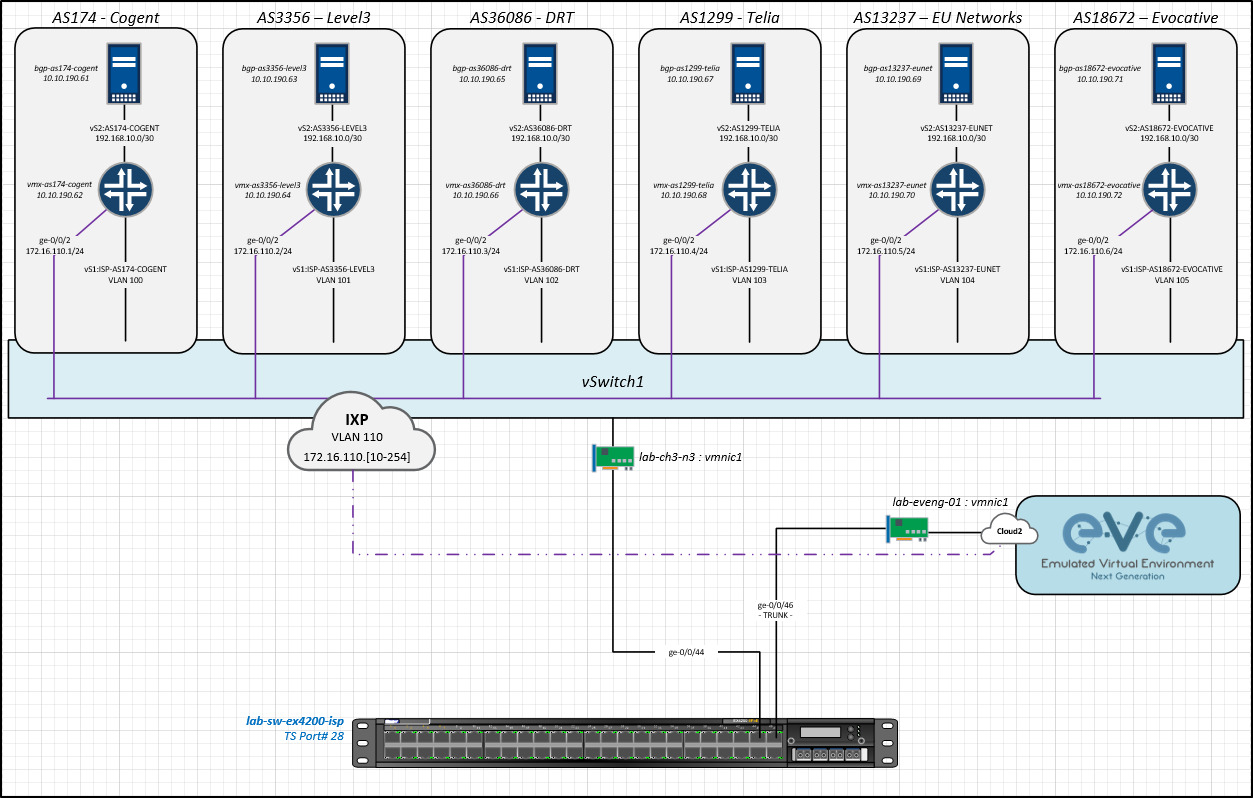
Example Diagram
Prerequisites
- Ubuntu 16.04 Server (Advertisement Server)
- Router with BGP Services (tested with ~ Cisco vIOS, Juniper vMX, Quagga, FRRouting)
- Python 2.7
- Perl 5.x
Applications Used / References
- mrtparse ~ Used to read and analyze the MRT format data from RIPE or the Route Views Project
- bgpsimple ~ Used to establish a BGP adjacency with a BGP peer device.
1 – Download and configure mrtparse
The first step that we need to complete, is to setup mrtparse. This application is used to convert the MRT formatted data into bgpdump formatted data that bgpsimple can use.
As the root user on your server, create a directory named mrtparse and then download the latest version from GIT. Once downloaded, we will then setup Python with this new Python module.
mkdir -p /usr/lib/mrtparse
cd /usr/lib/mrtparse

git clone https://github.com/YoshiyukiYamauchi/mrtparse.git .

python setup.py install

cp /usr/lib/mrtparse/examples/mrt2bgpdump.py /usr/lib/mrtparse/
2 – Download and convert MRT data to BGPDUMP
Once you have mrtparse setup, we can now download the latest data-set from either RIPE or the Route Views Project. For this example, we will be downloading the latest RIB table from the Route Views Project, Ashburn VA peering servers. If you want to setup your lab with multiple views of paths, you will need to download source data from multiple viewpoints.
mkdir -p /usr/lib/mrtparse/routeviews
cd /usr/lib/mrtparse/

wget http://archive.routeviews.org/route-views.eqix/bgpdata/$(date "+%Y.%m")/RIBS/rib.$(date "+%Y%m%d").0000.bz2 -O routeviews/rib.$(date "+%Y%m%d").0000.bz2
The next step is to convert the compressed BIN formatted MRT data into a format that is used by bgpsimple. bgpsimple uses BGPDUMP formatted data, which mrtparse is used to convert the MRT data into this format. This conversion can take quite a while to complete, depending on how large the data-set is. We have seen it take between 2-4 hours to convert.
/usr/lib/mrtparse/mrt2bgpdump.py -m -O routeviews/rib.$(date "+%Y%m%d").table routeviews/rib.$(date "+%Y%m%d").0000.bz2
3 – Download and configure bgpsimple
We are now ready to install bgpsimple. This is used to establish the initial adjancenty to our BGP router, which could act as an ISP peering source. For our lab example, we are wanting to emulate ourselves as the carriers (CenturyLink / Level3) peering device.
First, we need to download and install bgpsimple
mkdir -p /usr/lib/bgpsimple
cd /usr/lib/bgpsimple

git clone https://github.com/xdel/bgpsimple.git .
Now, we need to install the PERL module NET::BGP
apt install cpanminus build-essential

cpanm Net::BGP
Next, we need to create a symbolic link to the RIB data-set that we just converted to bgpdump format.
ln -s /usr/lib/mrtparse/routeviews/rib.$(date "+%Y%m%d").table rib.table
Now we are going to create a configuration file for our startup script. This is a custom script that we created to help setup bgpsimple as a service on our server.
Create a file named /usr/lib/bgpsimple/bgp_service.conf
nano /usr/lib/bgpsimple/bgp_service.conf
Now, add the following configuration variables to the file. You can change the variables as needed. We have provided example data in the variables below.
If you will be advertising a full internet table, or more than 1000 routes, we recommend leaving the holdtime set to 7200 seconds or more.
bgpsimple does not send a keepalive packet until the full table set has been updated to the peering device. If your holdtime is to short, the BGP peering session will disconnect.
###
### bgpsimple start script configuration variables
###

bin_path="/usr/lib/bgpsimple/bgp_simple.pl"
routes_file="/usr/lib/bgpsimple/rib.table"

my_asn=65000
my_ip=192.168.10.1
next_hop_ip=192.168.10.1

peer_ip=192.168.10.2
peer_asn=65000

holdtime=7200	# 2 hours
keepalive=20
local_pref=

number_of_routes=1000
route_filter=""
Next, we need to create the startup script that will be used by SystemD services to start, stop, and restart the bgpsimple process.
touch /usr/lib/bgpsimple/bgp_service.sh
chmod +x /usr/lib/bgpsimple/bgp_service.sh

nano /usr/lib/bgpsimple/bgp_service.sh
Now add the below script into the bgp_service.sh bash script.
#!/bin/bash
PID=""

source bgp_service.conf


### DO NOT MODIFY BELOW THIS LINE ###

## Set Next-Hop IP Address
if [ ! -z "$next_hop_ip" ]
then
  options="-n ${my_ip} "
else
  options="-n ${next_hop_ip} "
fi

## Set Localpref Option
if [ ! -z "$local_pref" ]
then
  options="${options} -l ${local_pref} "
fi

## Set max number of routes to advertise
if [ ! -z "$number_of_routes" ]
then
  options="${options} -m ${number_of_routes} "
fi

## Set a route filter
if [ ! -z "$route_filter" ]
then
  options="${options} ${route_filter} "
fi


function get_pid {
   PID=`pidof perl ./bgp_simple.pl`
}

function stop {
   get_pid
   if [ -z $PID ]; then
      echo "Server is not running."
      exit 1
   else
      echo -n "Stopping server..."
      kill -9 $PID
      sleep 1
      echo ".. Done."
   fi
}


function start {
   get_pid
   if [ -z $PID ]; then
      echo  "Starting server..."
    ${bin_path} -nolisten -myas ${my_asn} -myip ${my_ip} -peeras ${peer_asn} -peerip ${peer_ip} -holdtime ${holdtime} -keepalive ${keepalive} -p ${routes_file} ${options} &>/dev/null &
      get_pid
      echo "Service Start."
    echo "bgp_simple service start on PID# ${PID}"
   else
      echo "Server is already running. PID# $PID"
   fi
}

function start_debug {
   get_pid
   if [ -z $PID ]; then
      echo  "Starting server..."
    ${bin_path} -nolisten -myas ${my_asn} -myip ${my_ip} -peeras ${peer_asn} -peerip ${peer_ip} -holdtime ${holdtime} -keepalive ${keepalive} -p ${routes_file} ${options};
      get_pid
      echo "Service Start."
    echo "bgp_simple service start on PID# ${PID}"
   else
      echo "Server is already running. PID# $PID"
   fi
}

function restart {
   echo  "Restarting server.."
   get_pid
   if [ -z $PID ]; then
      start
   else
      stop
      sleep 5
      start
   fi
}


function status {
   get_pid
   if [ -z  $PID ]; then
      echo "Server is not running."
      exit 1
   else
      echo "Server is running, PID=$PID"
   fi
}

case "$1" in
   start)
      start
   ;;
   stop)
      stop
   ;;
   restart)
      restart
   ;;
   status)
      status
   ;;
   debug)
    start_debug
   ;;
   *)
      echo "Usage: $0 {start|stop|restart|status|debug}"
esac
3.1 – Setup SystemD Service
If you would like to have the bgpsimple script executed on startup (server rebooted, etc), then you can create a SystemD startup script that calls the bash script we just created.
First, create a SystemD configuration file for this service.
nano /etc/systemd/system/bgpsimple.service
Now, add the below settings into the bgpsimple.service configuration file.
[Unit]
Description=bgpsimple
Documentation=https://github.com/xdel/bgpsimple
After=network.target
StartLimitIntervalSec=0
ConditionPathExists=/usr/lib/bgpsimple/rib.table

[Service]
WorkingDirectory=/usr/lib/bgpsimple/
Type=forking
Restart=on-failure
RestartSec=1
ExecStart=/bin/bash /usr/lib/bgpsimple/bgp_service.sh start
ExecStop=/bin/bash /usr/lib/bgpsimple/bgp_service.sh stop
KillMode=process
TimeoutStartSec=infinity


[Install]
WantedBy=multi-user.target
Next, we need to reload the SystemD configuration files and set the bgpsimple.service to enabled mode.
systemctl daemon-reload
systemctl enable bgpsimple.service
3.2 – Debug Mode Startup
In some situations, you may want to start the bgpsimple script in debug mode. This can be done simply by starting the service script in debug mode.
/usr/lib/bgpsimple/bgp_service.sh debug