
Today, we are going to walk you through how to setup a Juniper JNCIA Study Lab using the EVE-NG Emulation Environment.
Requirements
- EVE-NG Emulation Environment
- Juniper vSRX Appliance
- For this lab, we are using the Juniper Firefly vSRX Appliance (v12.1×46-D10.2)
- VyOS Router Appliance (Internet Emulation Router)
- For this lab, we are using the VyOS Router (v1.1.8)
- Virtual Desktop PC – This can be a Linux PC or a Windows PC.
- For this lab, we are using a TinyCore Linux VM (v6.4)
All of these devices are available on Ebay relatively inexpensive, and will provide for a robust lab for studying beyond the JNCIA exam.
- x2 – Juniper EX4200-24T (Layer2 / Layer3 capable) ~~ $40-$60 each
- x2 – Juniper SRX210H ~~ $40-$60 each
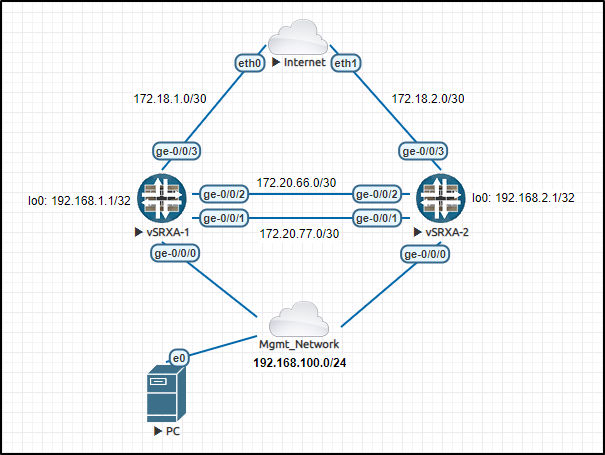
Network Topology
Preliminary Setup
First, we are going to setup our VyOS “Internet” router to support emulating an Internet Service Provider connection.
Login to your VyOS router and apply the below configuration. Once applied, commit and save the changes, as we will not need to access this device during the remainder of the lab.
Default Username: vyos | Default Password: vyos
configure

set system host-name 'internet'
set service ssh port '22'

set interfaces ethernet eth0 address '172.18.1.1/30'
set interfaces ethernet eth1 address '172.18.2.1/30'
set interfaces loopback lo address '1.1.1.1/32'

commit
save
Next, we are going to setup our virtual Management Workstation (PC) with a static IPv4 address.

Now that we have all of that out of the way, we are ready to move on to the Juniper appliance configurations.
Juniper Lab Setup
When you first login to your Juniper vSRX appliance, you will be prompted for a login. By default, the username is ‘root’ without a password. A key to knowing if this appliance is already configured with a root password is by the hostname of the appliance. By default, Juniper sets the hostname to “Amnesiac” if there is no password assigned.
As you can see below, this is our first login and settings up a password on the device.
Amnesiac (ttyd0)

login: root

--- JUNOS 12.1X46-D10.2 built 2013-12-18 02:43:42 UTC

root@% cli
root> configure
Entering configuration mode
The configuration has been changed but not committed

[edit]
root# set system root-authentication plain-text-password
New password:
Retype new password:

[edit]
root# commit
commit complete

[edit]
root@XXXhostnameXXX#
First, lets setup a hostname and password on each of our vSRX VMs.
Connect to each VM and setup the hostname relevant to that VM and the password ‘password123’.
cli
root> configure

[edit]
root# set system host-name {{hostname}}

[edit]
root# set system root-authentication plain-text-password
> password123 <
> password123 <

[edit]
root# commit
Example Screen
Amnesiac (ttyd0)

login: root

--- JUNOS 12.1X46-D10.2 built 2013-12-18 02:43:42 UTC

root@% cli
root> configure
Entering configuration mode
The configuration has been changed but not committed

[edit]
root# set system host-name vSRXA-2

[edit]
root# set system root-authentication plain-text-password
New password:
Retype new password:

[edit]
root# commit
commit complete

[edit]
root@vSRXA-2#
An SRX device can operate in two different modes: packet mode and flow mode. In flow mode, SRX processes all traffic by analyzing the state or session of traffic. This is also called stateful processing of traffic. In packet mode, SRX processes the traffic as a traditional router on a per-packet basis. This is also known as stateless processing of traffic. Security features like IPsec, NAT, UTM, and so on, do not work in packet mode. By default, Junos OS on SRX devices works in flow mode. For this lab, we are going to set the vSRX platforms into packet mode. Apply the following configurations to each vSRX VM and commit the changes. The VMs will then prompt you to reboot.
[edit]
root# delete security

[edit]
root# set security forwarding-options family mpls mode packet-based

[edit]
root# commit

[edit]
root# run request system reboot
Reboot the system ? [yes,no] (no) yes
You are now ready to begin studying for your JNCIA Exam!
Recommended Study Material
- Juniper Certification Tracks Website (understand the Exam Objectives)
- Introduction to the Junos Operating System (IJOS) – Student Guide
- Introduction to the Junos Operating System (IJOS) – Lab Guide
- Networking Fundamentals
- There are many study guides available that cover the basics of networking.
I personally recommend the Cisco CCNA ICND1 (CCENT) Study Guides.
- There are many study guides available that cover the basics of networking.
- Juniper Genius – Free Practice Exams